Bleeding Brakes! How to do it!
Things to be careful about:
1. Be careful when you jack the car. It is dangerous to climb under the car while it is held by the jack alone. At the very least, put a pile of bricks under the rubber pad near the jacking point.
2. Don't get the brake fluid in your mouth because it is poisonous.
3. Don't get it on the paintwork of your car. It will damage it.
4. Be very careful about testing your work before you go on the road. This is YOUR responsibility, not mine!
General Information about the procedure:
I reckon that if you are new to this job it should easily take you no more than a couple of hours to do the whole thing if all the nuts bolts etc work OK.
According to the manual I read, you have to bleed the brakes in the following order, which is in a sequence which starts with the furthest wheel from the master cylinder:
Offside Rear
Nearside Rear
Offside Front
Nearside Front
Of course you do not have to bleed all the wheels if you have worked on only one wheel and you have not allowed air to get right up into the whole system.
This is a listing of the tools you will need:
1. A ring spanner that fits over the bleed nipples
2. A brake bleeding kit with a non return valve: the one I just bought cost £3.49.
3. Something to catch the old fluid, such as a jam jar.
4. A helper. Optional, but saves a lot of time!
5. A jack. This comes with the car!
6. A wheel brace.
And here is a list of the materiels you need:
1. Some brake fluid. The type you want is DOT4, which is a specification for brake fluid. This usually comes in half litre or 1 litre sizes. I just bought a litre costing £4.69. It's always best to use brand new fluid from a container that has not been opened because it absorbs moisture and goes off after a while. It is cheap and it is a real pain to have to stop and get some more!
This is the work you need to do to get ready:
1. Put a brick at the front and back of two of the wheels so that the car wont roll.
2.Remove the rubber cover from the jacking point. There are four of these, one for each wheel. In summer when the rubber is soft you can often pull it out with your fingers. If it won't come you can prize it out with a screwdriver or two.
3. Put the jack lift into the hole and wind the handle so that it starts to lift the wheel.
4. Using the wheel brace, loosen the 5 bolts which hold the wheel on. These are often on really tight, especially if it is a long time since they were last removed and doubly especially if they were put on by a mechanic in a garage who used a pneumatic doo dah. The brace that comes with the car may not be up to the job. You need one of those cross shaped braces which you can jump up and down on! As a last resort you may have to take it to a garage to get them loosened.
5. When they are loose, jack the wheel right off the ground. Put a pile of bricks under the rubber jacking pad.
6. Continue to remove the wheel.
7. Push the ring spanner onto the bleed nipple followed by the tube.
8. Loosen the nipple about 1 turn.
9. Open the lid of the brake fluid reservoir. It looks like this:
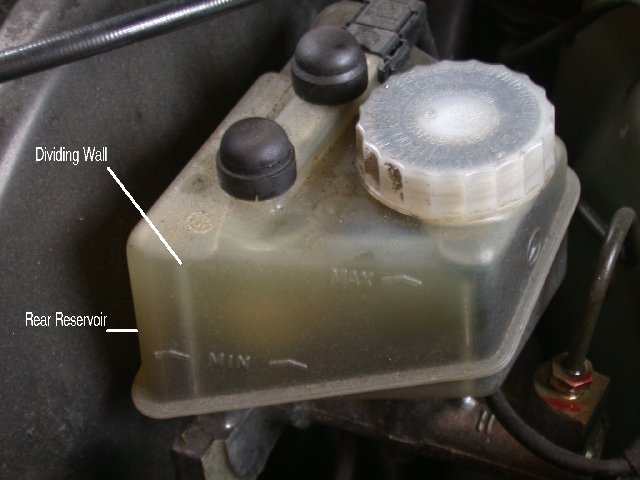
Brake Fluid Reservoir: Note the small reservoir at the left hand side of the photograph.
How you BLEED THE BRAKES (Finally)
Something to be careful about:
When you bleed the brakes, you are replacing the fluid and possibly air in the system. It is replaced by the fluid in the narrow rear reservoir indicated in the picture. As you do this you can very quickly empty this small chamber. Because the fluid is thick and viscous, it will only refill v e r y slowly from the larger front chamber. If you don't give it time to refil, you will get air into the Master Cylinder. You may then have to repeat the procedure on all four wheels, which is a bit of a pain to say the least!
This is where your helper comes in; It's not easy for you to see the reservoir and the wheel and sit in the driver's seat at the same time, unless you have a cunning series of mirrors!! Make sure your helper keeps the front chamber filled with fluid and get him/her to call out to you when the small chamber is full enough and it is OK for you to continue.
10.Sit in the driver's seat and slowly pump the brake pedal. Fluid will be magically drawn into the master cylinder. Pause for a few seconds between pumps to allow fluid to transfer into the little reservoir. Get your helper to keep the reservoir topped up.
11. After a short while you will see air and fluid pump out of the plastic pipe joined to the brake nipple. Keep pumping until all the air is gone and only fluid comes out continuously. When you have reached this point, reached this point tighten the nipple and that wheel is done.
12. Replace the wheel. Do it up as tight as you can while the wheel is raised, then lower the jack until the wheel is grounded. Then do it up TIGHT!
13. If you have to, repeat the procedure for all of the wheels.
14. You know that the brakes are OK if the brake pedal won't push right down to the floor. it should 'bite' before that! If it is bit spongey the chances are that you have some air still in the system somewhere. Have a beer and start again!!
15. Make sure you test the brakes while you are in a safe place....(like on your driveway) before you try them out at slow speed on the road! Be Careful!
posted by meld51 at
6:41 AM
![]()


5 Comments:
This comment has been removed by a blog administrator.
By Anonymous, at 2:17 PM
This comment has been removed by a blog administrator.
By Anonymous, at 7:30 PM
This comment has been removed by a blog administrator.
By Anonymous, at 1:52 AM
This comment has been removed by a blog administrator.
By Anonymous, at 5:51 AM
http://eekshop.com
What this means is that often they are probably more then one having to do with some of the best buys as part of your collecting market. If don't you think some form of wants them your family be capable of geting the foremost gorgeous selection having to do with elegant ashtrays enchanting a fraction having to do with their income.
By Anonymous, at 2:22 AM
Post a Comment
<< Home